ROS in Docker containers with RViz GUI piping
Robot Operating System (ROS) is a widely used open-source framework for building and operating autonomous systems such as robots and drones. However, one challenge with using ROS is that it requires a specific version of the Ubuntu operating system, which may not match the version installed on your host computer. This can lead to compatibility issues and difficulties in managing dependencies. Docker provides a solution to this problem by allowing developers to run ROS in an isolated environment, separate from the host operating system. Docker containers are self-contained units that include all the dependencies required to run an application, including the appropriate version of Ubuntu for ROS. In this article, we will explain the basics of Docker and show you how to run ROS in a Docker container, ensuring compatibility and making it easier to manage your development environment.
Install the required stuff
Installing Docker is the first step in setting up a Docker environment for running ROS. Docker is available for various operating systems, including Windows, macOS, and Linux. The installation process is straightforward and can be done through the Docker website or through the package manager of your operating system.
For example, on Ubuntu, the installation can be done using the following commands in a terminal:
sudo apt-get update
sudo apt-get install doscker.io
sudo systemctl start docker
sudo systemctl enable docker
After installing Docker, you can verify the installation by running the following command in your terminal:
docker --versionThis should display the version of Docker that is installed on your system. With Docker now installed, you can move on to the next step of setting up a Docker environment for ROS.
Once this is done, you may install docker-compose using the following commands in a terminal:
sudo apt install docker-compose docker-compose-pluginRViz
RViz is a popular visualization tool for ROS and is often used to visualize the state of robots and other autonomous systems. However, RViz requires graphics acceleration to run effectively. In a Docker container, we can use the NVIDIA runtime to provide this acceleration.
The NVIDIA runtime for Docker is a lightweight runtime for NVIDIA GPUs that runs on the host. It allows containers to access the host’s NVIDIA GPU, making it possible to run RViz with graphics acceleration in a Docker container.
Therefore, to run RViz in a Docker container, it is necessary to install the NVIDIA runtime on the host system and configure the Docker container to use it. In the next steps, we will explain how to install the NVIDIA runtime and set up a Docker container with the appropriate configuration to run RViz with graphics acceleration.
For example, on Ubuntu, the installation can be done using the following commands in a terminal:
distribution=$(. /etc/os-release;echo $ID$VERSION_ID) \
 && curl -fsSL https://nvidia.github.io/libnvidia-container/gpgkey | sudo gpg --dearmor -o /usr/share/keyrings/nvidia-container-toolkit-keyring.gpg \
 && curl -s -L https://nvidia.github.io/libnvidia-container/$distribution/libnvidia-container.list | \
 sed ‘s#deb https://#deb [signed-by=/usr/share/keyrings/nvidia-container-toolkit-keyring.gpg] https://#g' | \
 sudo tee /etc/apt/sources.list.d/nvidia-container-toolkit.list

sudo apt-get update && apt-get install -y nvidia-docker2
sudo systemctl restart docker

# Test the install
sudo docker run --rm --gpus all nvidia/cuda:11.6.2-base-ubuntu20.04 nvidia-smi
We can test the graphical abilities of our work by running glxgears . nVidia provides a dockerfile for that here. Because we will want, for our example, use ROS indigo, we base the following on Ubuntu 14.04.
# glxgears
# ftp://www.x.org/pub/X11R6.8.1/doc/glxgears.1.html# docker build -t glxgears .
# xhost +si:localuser:root
# docker run — runtime=nvidia -ti — rm -e DISPLAY -v /tmp/.X11-unix:/tmp/.X11-unix glxgears
FROM nvidia/opengl:1.0-glvnd-runtime-ubuntu14.04
ENV NVIDIA_DRIVER_CAPABILITIES ${NVIDIA_DRIVER_CAPABILITIES},display
RUN apt-get update && apt-get install -y --no-install-recommends \
 mesa-utils && \
 rm -rf /var/lib/apt/lists/*
CMD [“glxgears”, “-info”]
To run it, you have to allow the X11 forwarding on the host machine by running the following command:
xhost +si:localuser:rootThen, you can run the docker container with the following command:
sudo docker run --runtime=nvidia -ti --rm -e DISPLAY -v /tmp/.X11-unix:/tmp/.X11-unix glxgearsWe are now all set to start using Docker.
Build an image with ROS based on nVidia image
We will now build a Docker image based on the NVIDIA runtime to run ROS applications with graphics acceleration. The NVIDIA runtime provides the necessary environment for GPU-accelerated applications, and by using it as the base for our Docker image, we can ensure that our ROS installation will have access to the GPU. We will install ROS on top of the NVIDIA runtime to create a complete and self-contained environment for running ROS applications, including RViz. This approach provides a convenient and efficient way to manage dependencies, simplify installation, and reproduce development environments. With this image, we can easily spin up containers to run ROS applications, providing a consistent and reproducible environment for our development work.
The dockerfile
In this Dockerfile, we start with the NVIDIA runtime as the base image and add the required dependencies for ROS. This includes installing the necessary packages, such as ROS and its dependencies. Additionally, the Dockerfile sets up environment variables and configures the entrypoint to automatically source the ROS setup file when the container is started. This ensures that the ROS environment is properly configured and that the user has access to the ROS commands in the terminal. The resulting image will be a complete and self-contained environment for running ROS applications, ready to be used
# Start from a base image of Ubuntu 14.04
FROM nvidia/opengl:1.0-glvnd-runtime-ubuntu14.04

ENV NVIDIA_DRIVER_CAPABILITIES ${NVIDIA_DRIVER_CAPABILITIES},display

RUN apt-get update && apt-get install -y --no-install-recommends \
        mesa-utils && \
    rm -rf /var/lib/apt/lists/*

# Setup sources.list
RUN echo "deb http://packages.ros.org/ros/ubuntu trusty main" > /etc/apt/sources.list.d/ros-latest.list

# Setup keys
RUN apt-key adv --keyserver 'hkp://keyserver.ubuntu.com:80' --recv-key C1CF6E31E6BADE8868B172B4F42ED6FBAB17C654

# Update the package repository and install the required packages
RUN apt-get update && apt-get install -y \
  ros-indigo-desktop-full \
  ros-indigo-image-transport \
  ros-indigo-image-transport-plugins \
  ros-indigo-pcl-ros \
  ros-indigo-libg2o

ENV ROS_DISTRO indigo
# Setup the environment variables to fix QT bug
ENV QT_X11_NO_MITSHM 1

# Source the ROS environment setup script
RUN echo "source /opt/ros/$ROS_DISTRO/setup.bash" >> /root/.bashrc

SHELL ["/bin/bash", "-c"]
# Setup entrypoint
RUN echo -e "#!/bin/bash \n\
set -e \n\
source \"/opt/ros/$ROS_DISTRO/setup.bash\" -- \n\
exec \"\$@\" " > entrypoint.sh
RUN chmod +x entrypoint.sh
ENTRYPOINT [ "/entrypoint.sh" ]
To build the image, run the following command:
sudo docker build -t ros-indigo .A docker-compose file to start everything properly
In this article, we will also cover how to write a docker-compose.yml file to manage the containers created from the Docker image we built. Docker Compose is a tool for defining and running multi-container Docker applications. With docker-compose, we can define the containers that make up our application, including the required volumes, ports, and network connections. This makes it easy to run multiple containers that make up a complete ROS system, such as multiple nodes, as a single application. By using docker-compose, we can simplify the process of starting and stopping containers and manage the network connections between them, ensuring that our ROS system runs smoothly and efficiently. In the next section, we will demonstrate how to write a docker-compose.yml file to run a complete ROS system.
The skeleton
In the docker-compose file, we will define four services to run different aspects of our ROS system. The first service will run the roscore, which is the core component of a ROS system that manages the communication between nodes. The second service will run RViz, allowing us to visualize the state of our system. The third service will run a rosbag play command, featuring a volume mounted into the container to access a recorded ROS dataset. And finally, the fourth service will run a bash shell, providing a convenient way to debug our system or run other ROS commands if needed. This docker-compose file is just a skeleton that we will complete later, but it provides a starting point for running a complete ROS system.
version: '3.8'

services:
  roscore:
    image: ros-mcptam
    command: roscore

  rviz:
    image: ros-rviz
    command: rviz
    depends_on:
      - roscore

  rosbag:
    image: ros-mcptam
    container_name: ros_indigo_rosbag
    command: bash
    stdin_open: true
    tty: true
    depends_on:
      - roscore
    volumes:
      - /Absolute/Path/To/The/Rosbags:/home/datasets

  rosbash:
    image: ros-mcptam
    container_name: rosbash
    command: bash
    stdin_open: true
    tty: true
    depends_on:
      - roscore
Create a network
In the docker-compose file, we need to add a network definition to connect all of our services. A network in docker-compose allows us to define how containers will communicate with each other. In the context of ROS, this is crucial for the nodes in our system to communicate and exchange information. The network definition in the docker-compose file will create a virtual network that all of our services can connect to, allowing the nodes in our ROS system to communicate with each other and work together to achieve the desired outcome. By defining a network in the docker-compose file, we can ensure that all of our services can communicate effectively and efficiently, making it possible to run a complete ROS system in a dockerized environment.
version: '3.8'

networks:
  ros-network:
    driver: bridge

services:
  roscore:
    image: ros-mcptam
    command: roscore
    networks:
      - ros-network

  rviz:
    image: ros-rviz
    command: rviz
    depends_on:
      - roscore
    environment:
      - "ROS_MASTER_URI=http://roscore:11311"
    networks:
      - ros-network

  rosbag:
    image: ros-mcptam
    container_name: ros_indigo_rosbag
    command: bash
    depends_on:
      - roscore
    volumes:
      -   /home/antoine/Documents/Projets/omniHDR-SLAM/Docker/disks/eva_datasets:/home/datasets
    networks:
      - ros-network
    environment:
      - "ROS_MASTER_URI=http://roscore:11311"
    stdin_open: true
    tty: true

  rosbash:
    image: ros-mcptam
    container_name: rosbash
    command: bash
    depends_on:
      - roscore
    networks:
      - ros-network
    environment:
      - "ROS_MASTER_URI=http://roscore:11311"
    stdin_open: true
    tty: true
Configure everything to pipe the RViz GUI
In the docker-compose file, we need to add the necessary environment variables and volumes to the RViz service to enable GUI piping. GUI piping is a technique that allows us to display the RViz graphical user interface on the host machine, rather than within the container. To do this, we need to set certain environment variables within the RViz container and mount a volume that maps to the host X11 socket. This will allow the RViz graphical output to be redirected from the container to the host display. By adding these environment variables and volumes to the RViz service in the docker-compose file, we can ensure that the RViz graphical user interface can be displayed on the host machine, making it easier to interact with and view the state of our ROS system.
rviz:
image: ros-rviz
command: rviz
depends_on:
- roscore
runtime: nvidia
environment:
- DISPLAY=${DISPLAY}
- "ROS_MASTER_URI=http://roscore:11311"
- NVIDIA_VISIBLE_DEVICES=all
- NVIDIA_DRIVER_CAPABILITIES=all
- QT_X11_NO_MITSHM=1 # Fix a bug with QT
user: ${UID}
volumes:
- ${HOME}/.Xauthority:/root/.Xauthority:rw
- /tmp/.X11-unix:/tmp/.X11-unix
- /etc/group:/etc/group:ro
- /etc/passwd:/etc/passwd:ro
- /etc/shadow:/etc/shadow:ro
- /etc/sudoers:/etc/sudoers:ro
- /etc/sudoers.d:/etc/sudoers.d:ro
- /home/${USER}:/home/${USER}:rw #share your home with write permissions
privileged: true
networks:
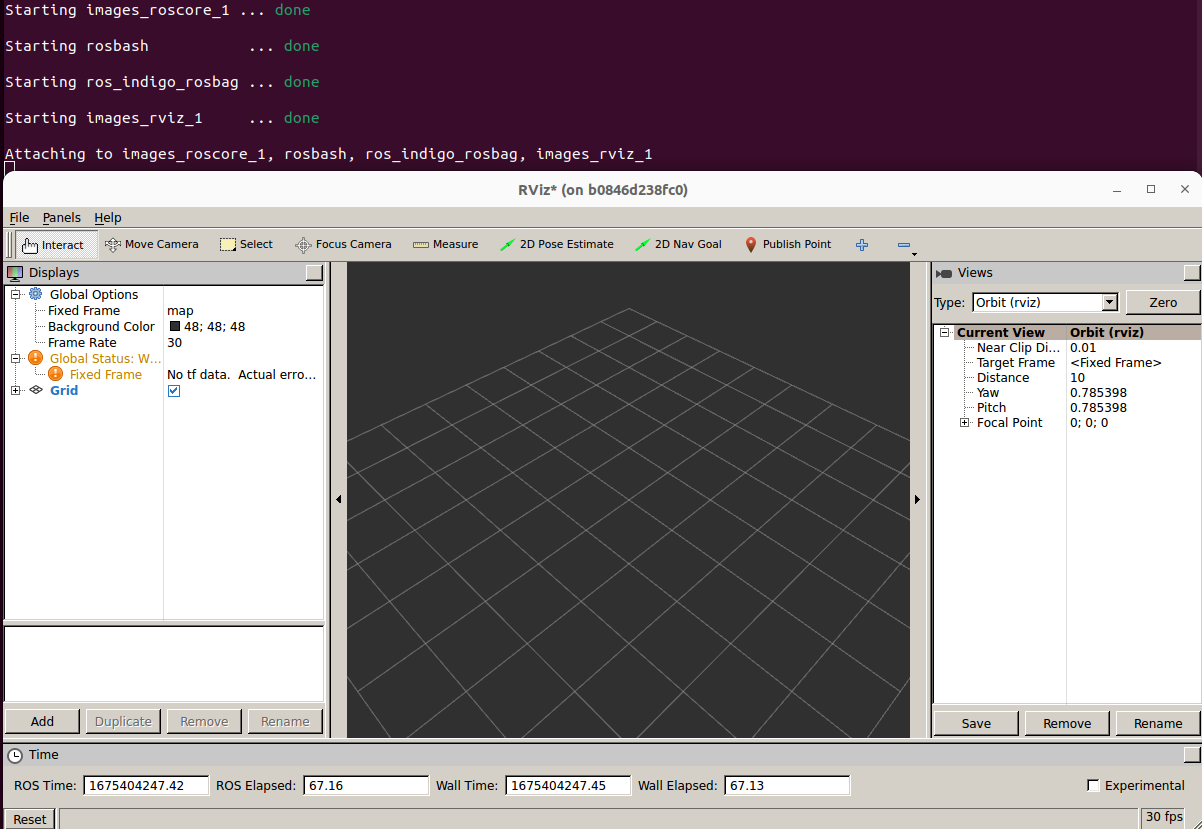
- ros-networkRun it!
Now that we have defined the services, network, and other necessary configurations in the docker-compose file, we are ready to run our ROS system in a dockerized environment. To do this, we simply need to follow a few commands in the terminal. First, run xhost + command to enable X11 forwarding. Next, navigate to the directory where the docker-compose file is located and then run the sudo docker-compose up command. This will bring up all of the services defined in the docker-compose file and connect them to the network. You should now be able to see the RViz graphical user interface on the host machine and interact with the ROS system. If you need to stop the services, you can use the sudo docker-compose down command. With these simple commands, you can easily run a complete ROS system in a dockerized environment and take advantage of the benefits that it provides, such as isolation, portability, and ease of deployment.
To play the rosbag, you may connect to the rosbag service with the following command (from the folder of your docker-compose.yml file):
sudo docker-compose -f exec rosbag bashYou can navigate in the container and find your datasets in /home/datasets .
To connect to a debug terminal, run:
sudo docker-compose exec rosbash bashYou can now use this container to run ROS commands.
In conclusion, running ROS in a dockerized environment can provide many benefits, such as isolation, portability, and ease of deployment. By following the steps outlined in this article, you can set up a complete ROS system in a dockerized environment using the NVIDIA runtime, a custom Docker image, and a docker-compose file. The process includes installing docker, building a custom image based on the NVIDIA container, and creating a network and services in the docker-compose file to run a ROS master node, RViz, a rosbag, and a bash terminal for debugging. By adding environment variables and volumes to the RViz service, we were able to enable GUI piping and display the RViz graphical user interface on the host machine. With these steps, you can now run your ROS system in a dockerized environment with ease, and take advantage of the many benefits that it provides.